자바 UI - 04) Swing (텍스트 컴포넌트)
텍스트 컴포넌트
텍스트 컴포넌트는 텍스트를 나타내거나 편집할 수 있는 컴포넌트를 말한다.
- 텍스트 컴포넌트에는 JLabel, JTextField, JPasswordField, JTextArea, JEditorPane, JTextPane 등이 있다.
- JLabel만 텍스트를 편집할 수 없고, 나머지는 텍스트를 편집할 수 있다.
- 편집 가능한 텍스트 컴포넌트는 모두 JTextComponent를 상속받아 각 컴포넌트의 특징에 맞게 설계되었다.
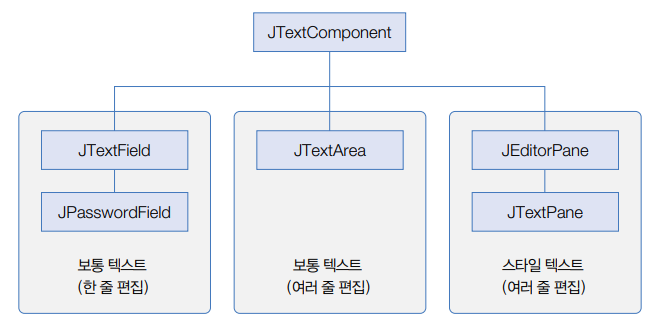
JTextField와 JPasswordField는 단일 라인의 텍스트를 편집할 수 있고, JTextArea, JEditorPane, JTextPane은 멀티 라인 편집을 지원한다.
JLabel
JLabel은 편집할 수 없는 한 줄의 간단한 텍스트와 정적인 이미지를 보여주는 컴포넌트이다.
JLabel 에 텍스트와 이미지를 설정하는 방법
JLabel jLabel = new JLabel();
jLabel.setText("텍스트");
jLabel.setIcon(new ImageIcon( getClass().getResource("이미지파일"));
텍스트와 이미지의 배치는 정렬(alignment)과 위치(position) 그리고 간격(gap)으로 조절할 수 있다.
정렬은 JLabel 전체 내용물의 위치를 의미하고, 위치는 이미지와 텍스트 사이의 상대적인 위치를 의미한다.
간격은 텍스트와 이미지의 간격이다.
//JLabel 영역에서의 내용물(텍스트+이미지)의 위치
setHorizontalAlignment( JLabel.LEFT | JLabel.CENTER | JLabel.RIGHT );
setVerticalAlignment( JLabel.TOP | JLabel.CENTER | JLabel.BOTTOM );
//텍스트와 이미지의 상대적인 위치
setHorizontalTextPosition( JLabel.LEFT | JLabel.CENTER | JLabel.RIGHT );
setVerticalTextPosition( JLabel.TOP | JLabel.CENTER | JLabel.BOTTOM );
//텍스트와 이미지 사이의 간격
setIconTextGap( iconTextGap );
JLabel의 경계선은 기본적으로 없기 때문에 경계선의 모양을 주고 싶다면 setBorder() 메소드를 사용
setBorder(Border border);
매개값은 Border 인터페이스 구현 객체인데, Border 구현 클래스는 javax.swing.border 패키지 에 포함되어 있다.
예) 조각칼로 판 모양의 경계를 사용하고 싶다면 다음과 같이 EtchedBorder 를 지정하면 된다.
setBorder(new EtchedBorder());JLabel은 마우스로 클릭할 수 없고, 키보드로 편집할 수도 없기 때문에, 특별한 이벤트가 발생하지 않는다.
import java.awt.GridLayout;
import javax.swing.ImageIcon;
import javax.swing.JFrame;
import javax.swing.JLabel;
import javax.swing.SwingUtilities;
import javax.swing.border.EtchedBorder;
public class JLabelExample extends JFrame{
private JLabel jLabel1, jLabel2, jLabel3, jLabel4;
public JLabelExample() {
this.setTitle("JLabelExample");
this.setDefaultCloseOperation(JFrame.EXIT_ON_CLOSE);
this.getContentPane().setLayout(new GridLayout(4, 1));
this.getContentPane().add(getJLabel1());
this.getContentPane().add(getJLabel2());
this.getContentPane().add(getJLabel3());
this.getContentPane().add(getJLabel4());
this.setSize(200, 300);
}
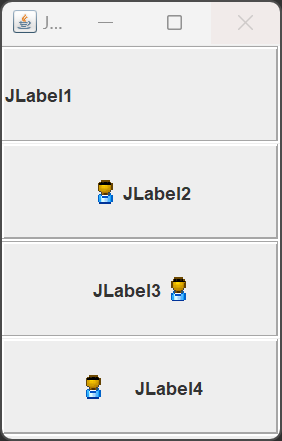
// JLabel 4개 생성
// 텍스트 왼쪽 정렬, EtchedBorder
public JLabel getJLabel1() {
if(jLabel1 == null) {
jLabel1 = new JLabel();
jLabel1.setText("JLabel1");
jLabel1.setHorizontalAlignment(JLabel.LEFT);
jLabel1.setBorder(new EtchedBorder());
}
return jLabel1;
}
// 이미지 추가, 내용물 중앙 정렬
public JLabel getJLabel2() {
if (jLabel2 == null) {
jLabel2 = new JLabel();
jLabel2.setText("JLabel2");
jLabel2.setIcon(new ImageIcon(getClass().getResource("user.gif")));
jLabel2.setHorizontalAlignment(JLabel.CENTER);
jLabel2.setBorder(new EtchedBorder());
}
return jLabel2;
}
// 이미지 왼쪽에 텍스트가 오도록 설정
public JLabel getJLabel3() {
if (jLabel3 == null) {
jLabel3 = new JLabel();
jLabel3.setText("JLabel3");
jLabel3.setIcon(new ImageIcon(getClass().getResource("user.gif")));
jLabel3.setHorizontalAlignment(JLabel.CENTER);
jLabel3.setHorizontalTextPosition(JLabel.LEFT);
jLabel3.setBorder(new EtchedBorder());
}
return jLabel3;
}
// 이미지와 텍스트 사이의 간격 설정
public JLabel getJLabel4() {
if (jLabel4 == null) {
jLabel4 = new JLabel();
jLabel4.setText("JLabel4");
jLabel4.setIcon(new ImageIcon(getClass().getResource("user.gif")));
jLabel4.setHorizontalAlignment(JLabel.CENTER);
jLabel4.setIconTextGap(20);
jLabel4.setBorder(new EtchedBorder());
}
return jLabel4;
}
public static void main(String[] args) {
SwingUtilities.invokeLater(new Runnable() {
public void run() {
JLabelExample jFrame = new JLabelExample();
jFrame.setVisible(true);
}
});
}
}- 실행 결과 -
JTextField와 JPasswordField
JTextField와 JPasswordField는 단일 라인의 텍스트 입력란을 제공하는 컴포넌트이다.
차이점은 JPasswordField는 사용자의 입력을 다른 사람이 볼 수 없도록 숨긴다는 것이다.
아이디 입력 내용이 알파벳인지 검사하고, Enter 키를 누르면 입력한 패스워드를 보여주는 방법
import java.awt.GridLayout;
import java.awt.event.ActionEvent;
import java.awt.event.ActionListener;
import java.awt.event.KeyAdapter;
import java.awt.event.KeyEvent;
import javax.swing.JFrame;
import javax.swing.JLabel;
import javax.swing.JOptionPane;
import javax.swing.JPasswordField;
import javax.swing.JTextField;
import javax.swing.SwingUtilities;

public class JTextFieldJPasswordFieldExample extends JFrame {
	private JTextField txtId;
	private JPasswordField txtPassword;

	public JTextFieldJPasswordFieldExample() {
		this.setTitle("JTextField & JPasswordField");
		this.setDefaultCloseOperation(JFrame.EXIT_ON_CLOSE);
		this.getContentPane().setLayout(new GridLayout(2, 2));
		this.getContentPane().add(new JLabel("아이디", JLabel.CENTER));
		this.getContentPane().add(getTxtId());
		this.getContentPane().add(new JLabel("패스워드", JLabel.CENTER));
		this.getContentPane().add(getTxtPassword());
		this.setSize(200, 100);
	}

	// JTextField 생성
	public JTextField getTxtId() {
		if (txtId == null) {
			txtId = new JTextField();
			txtId.addKeyListener(new KeyAdapter() {
				public void keyPressed(KeyEvent e) {
					if (e.getKeyCode() >= KeyEvent.VK_A && e.getKeyCode() <=
						KeyEvent.VK_Z) {
						JOptionPane.showMessageDialog(
						JTextFieldJPasswordFieldExample.this, "알파벳 이군요");
					} else {
						JOptionPane.showMessageDialog(
						JTextFieldJPasswordFieldExample.this, "알파벳이 아니군요");
					}
				}
			});
		}
		return txtId;
	}

	public JPasswordField getTxtPassword() {
		if (txtPassword == null) {
			txtPassword = new JPasswordField();
			txtPassword.addActionListener(new ActionListener() {
				public void actionPerformed(ActionEvent e) {
					String password = new String(txtPassword.getPassword());
					JOptionPane.showMessageDialog(
						JTextFieldJPasswordFieldExample.this, "입력한 패스워드: " +
						password);
				}
			});
		}
		return txtPassword;
	}
	public static void main(String[] args) {
		SwingUtilities.invokeLater(new Runnable() {
			public void run() {
			JTextFieldJPasswordFieldExample jFrame = new
			JTextFieldJPasswordFieldExample();
			jFrame.setVisible(true);
			}
		});

	}

}
- 실행 결과 -


JTextArea
JTextArea는 멀티 라인의 텍스트를 편집할 수 있는 컴포넌트이다.
JTextArea는 자체적으로 스크롤을 제공하지 않으므로 JScrollPane에 추가해서 사용된다.
JTextArea jTextArea = new JTextArea();
JScrollPane jScrollPane = new JScrollPane( jTextArea );
JTextArea에서 키보드로 텍스트를 편집할 경우에는 스크롤이 따라 움직이지만, 프로그램에 의해 편집될 경우에는 스크롤이 따라 움직이지 않는다
다음 코드를 추가하면 스크롤이 자동으로 내용에 맞게 움직이게 된다.
jTextArea.setCaretPosition( jTextArea.getText().length() );
채팅창을 흉내내어 입력한 내용을 전송하면 JTextArea에 출력하는 방법
import java.awt.BorderLayout;
import java.awt.event.ActionEvent;
import java.awt.event.ActionListener;
import javax.swing.JButton;
import javax.swing.JFrame;
import javax.swing.JPanel;
import javax.swing.JScrollPane;
import javax.swing.JTextArea;
import javax.swing.JTextField;
import javax.swing.SwingUtilities;


public class JTextAreaExample extends JFrame {
	private JTextArea txtDisplay;
	private JPanel pSouth;
	private JTextField txtInput;
	private JButton btnSend;

	public JTextAreaExample() {
		this.setTitle("JTextAreaExample");
		this.setDefaultCloseOperation(JFrame.EXIT_ON_CLOSE);
		this.getContentPane().add(new JScrollPane(getTxtDisplay()), BorderLayout.CENTER);
		this.getContentPane().add(getPSouth(),BorderLayout.SOUTH);
		this.setSize(300, 200);
	}
	// JTextArea 생성
	public JTextArea getTxtDisplay() {
		if(txtDisplay == null) {
			txtDisplay = new JTextArea();
			txtDisplay.setEditable(false);
		}
		return txtDisplay;
	}

	// 남쪽에 부착할 JPanel 생성
	public JPanel getPSouth() {
		if(pSouth == null) {
			pSouth = new JPanel();
			pSouth.setLayout(new BorderLayout());
			pSouth.add(getTxtInput(), BorderLayout.CENTER);
			pSouth.add(getBtnSend(), BorderLayout.EAST);
		}
		return pSouth;
	}

	//JTextField 생성
	public JTextField getTxtInput() {
		if (txtInput == null) {
			txtInput = new JTextField();
		}
		return txtInput;
	}

	//JButton 생성
	public JButton getBtnSend() {
		if (btnSend == null) {
			btnSend = new JButton();
			btnSend.setText("전송");
			btnSend.addActionListener(new ActionListener() {
				public void actionPerformed(ActionEvent e) {
					getTxtDisplay().append(getTxtInput().getText() + "\n");
					getTxtInput().setText("");
				}
			});
		}
		return btnSend;
	}

	public static void main(String[] args) {
		SwingUtilities.invokeLater(new Runnable() {
			public void run() {
				JTextAreaExample jFrame = new JTextAreaExample();
				jFrame.setVisible(true);
			}
		});
	}
}
- 실행 결과 -

JEditorPane
EditorPane은 다양한 타입의 문서를 보여주거나 편집이 가능한 멀티 라인의 텍스트 컴포넌트이다.
기본적으로 단순 텍스트(text/plain), HTML(text/html) 타입의 문서를 지원한다
아쉬운 점은 JEditorPane은 HTML 3.2 태그만 지원하고, HTML 4.0이나, XHTML, HTML5는 지원하지 않는다.
import java.awt.BorderLayout;
import java.io.IOException;
import javax.swing.JEditorPane;
import javax.swing.JFrame;
import javax.swing.JScrollPane;
import javax.swing.SwingUtilities;
import javax.swing.event.HyperlinkEvent;
import javax.swing.event.HyperlinkListener;
import javax.swing.event.DocumentEvent.EventType;

public class JEditorPaneExample extends JFrame {
	private JEditorPane jEditorPane;

	public JEditorPaneExample() {
		this.setTitle("JEditorPaneExample");
		this.setDefaultCloseOperation(JFrame.EXIT_ON_CLOSE);
		this.getContentPane().add(new JScrollPane(getJEditorPane()),BorderLayout.CENTER);
		this.setSize(400,300);
	}

	public JEditorPane getJEditorPane() {
		if(jEditorPane == null) {
			jEditorPane = new JEditorPane();
			try {
				jEditorPane.setPage(getClass().getResource("jeditorpane.html"));
			} catch(Exception e) {}
			jEditorPane.setEditable(false);
			jEditorPane.addHyperlinkListener(new HyperlinkListener() {
				public void hyperlinkUpdate(HyperlinkEvent e) {
					if(e.getEventType() == HyperlinkEvent.EventType.ACTIVATED) {
						try {
							jEditorPane.setPage(e.getURL());
						} catch(IOException e2) {}
					}
				}
			});
		}
		return jEditorPane;
	}

	public static void main(String[] args) {
		SwingUtilities.invokeLater(new Runnable() {
			public void run() {
			JEditorPaneExample jFrame = new JEditorPaneExample();
			jFrame.setVisible(true);
			}
		});
	}
}
- 실행 결과 -
